Google Search Console is an indispensable tool for SEO as it provides data about the organic performance of a website or page.
Understanding how users search for products and services, measuring your site performance in the search engines, and getting recommendations for improvements are vital to SEO.
Originally known as Google Webmaster Tools, Google Search Console is the SEO tool that most SEO professionals either do use, or should be using for insights and technical health.
What Is Google Search Console (GSC)?
Google Search Console, also known as GSC, is a free service from Google that allows site owners to monitor their overall site health and performance using data directly from Google.
Among its many facets, GSC provides several valuable reports, including:
- Impressions and Clicks.
- Indexation.
- Links.
- Manual Actions.
- Core Web Vitals (CWV).
GSC also allows site owners to take actions related to their site like:
- Submitting a sitemap.
- Removing URLs from the index.
- Inspecting URLs for any indexing issues.
Additionally, GSC regularly sends updates via email to verified owners and users indicating any crawl errors, accessibility issues, or performance problems.
While the data for GSC has been expanded from just 3 months to up to 16 months, it doesn’t start collecting data until you have verified your ownership of the property in question.
How To Get Started With GSC
To get started with Google Search Console, you’ll need a working Google account – such as a Gmail account or an email account associated with a Google Workspace (formerly G Suite) for business – and you’ll need to be able to add code to your website or update the domain name servers with your hosting provider.
In this section, we’ll cover the following:
- How to verify site ownership in GSC.
- How to add a sitemap to GSC.
- Setting owners, users, and permissions.
- Dimensions and metrics.
How To Verify Ownership
Since the data provided and the available processes in GSC would be quite valuable to your competitors, Google requires that site owners take one of several available steps to verify their ownership.
It’s important to pause here and talk about the two different types of properties you can verify in GSC: Domain and URL Prefix.
Domain
If you are verifying your domain for the first time with GSC, this is the property type you should select, as it will establish verification for all subdomains, SSL patterns (http:// or https://), and subfolders on your site.
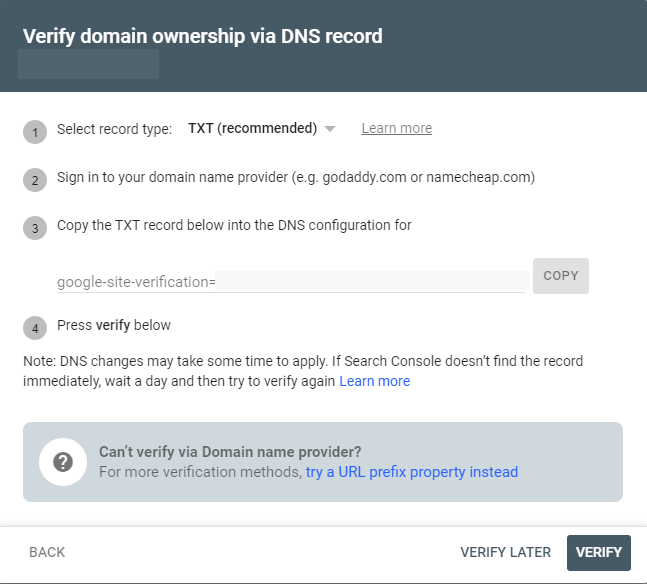
There are two types of verification for this property type: TXT and CNAME. Both will require you or your site engineer to have access to change your site’s Domain Name System (DNS) records.
For TXT verifications (preferred):
- Copy the text in the TXT record field.
- Create a new DNS record for your domain (usually your hosting provider), with the Type set to TXT.
- Paste the verification TXT from GSC into the Record field.
- Save Record.
- Please wait while the changes to your DNS update.
- Click Verify in GSC to verify that you have added the TXT record to your DNS.
- As replication of this change can take anywhere from a few minutes to a few days, you can click Verify Later if the change is not immediately verifiable.
For CNAME verifications:
- Copy the CNAME label and paste it into the Name field of a new CNAME record in your site’s DNS configuration.
- Copy the CNAME Destination/Target content into the Record field in your DNS configuration.
- Save Record.
- Please wait while the changes to your DNS update.
- Click Verify in GSC to verify that you have added the CNAME record to your DNS.
- As replication of this change can take anywhere from a few minutes to a few days, you can click Verify Later if the change is not immediately verifiable.

Watch this video by Google for more details:
Once you have verified your domain, you can verify additional properties for this domain using the URL Prefix property type.
URL Prefix
This verification method is used when you are unable to access your domain’s DNS records or when you want to verify specific URL paths under an existing Domain verification.
The URL Prefix verification allows you to verify:
- http:// and https:// separately (if you haven’t canonicalized your URLs).
- Subdomains, such as m.domain.com or community.domain.com.
- Subdirectories, such as www.domain.com/products or www.domain.com/articles.
- Any prefix with a set of URLs that follow that specific pattern.
Please note that this verification method will result in data that only follows the specified prefix.
While smaller websites may only need one verification, larger sites may want to individually track site health and metrics for subdomains and subdirectories to get a more complete set of data.
GSC gives you five options for verifying your site or sub-sections using this URL Prefix method:
- HTML Page – This method allows you to upload the .html file directly to your site’s root directory via a free FTP client or your hosting platform’s cPanel file manager.
- HTML Tag – By adding the provided HTML tag to your homepage’s <head> section, you verify your site. Many CMS platforms, like WordPress and Wix, allow you to add this tag through their interfaces.
- Google Analytics – If you’ve already verified your site on Google Analytics, you can piggyback on that verification to add your site to GSC.
- Google Tag Manager – Likewise, if you are already taking advantage of Google’s Tag Manager system, you can verify your site using the tags you’ve already embedded on your site.
- DNS Configuration – If you have already verified your site using the TXT or CNAME methods described above, you can verify sub-sections of your site using that verification method. Use this method when verifying subdomains or subdirectories.
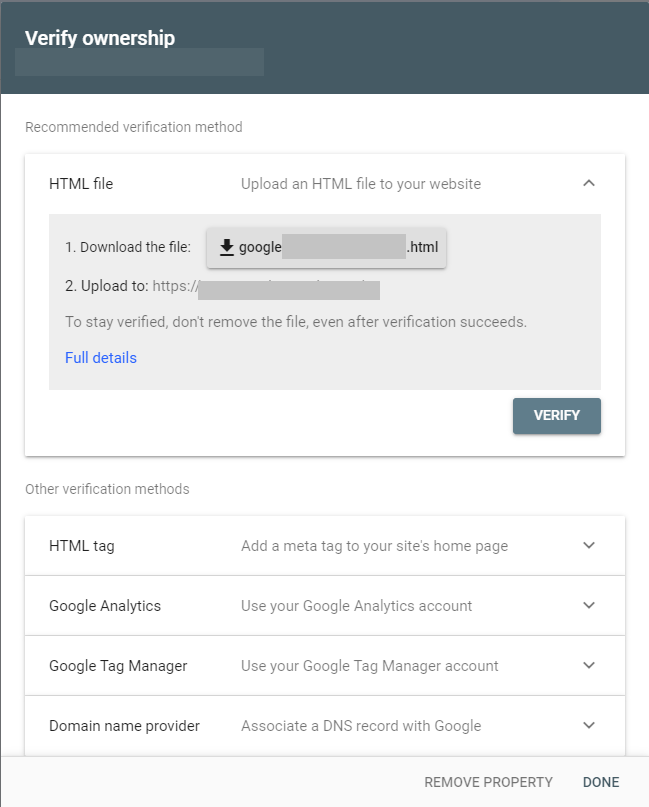
These verification methods can take anywhere from a few minutes to a few days to replicate, so if you need to click the Verify Later button and return later, you can find that site or segment in the Not Verified section under your account’s properties.
Simply click on the unverified site and click Verify Later.
How To Add A Sitemap In GSC
While Googlebot will most likely be able to find your site’s XML sitemap over time, you can expedite the process by adding your sitemaps directly into GSC.
To add a sitemap to GSC, follow these steps:
- Go to the sitemap you want to add and copy the URL. The syntax of most XML sitemaps is like “https://www.domain.com/sitemap.xml.” Sitemaps automatically generated by content management systems, like WordPress, may have this syntax instead: https://www.domain.com/sitemap_index.xml.
- In GSC, click on Sitemaps in the left column.
- Add your sitemap URL in the Add a new sitemap field at the top of the page and click Submit.

Note that you can add as many sitemaps as your site requires. Many sites will have separate sitemaps for videos, articles, product pages, and images.
The added benefit of including your sitemaps in this interface is that you can compare the number of pages your site has submitted to Google to the number of indexed pages.
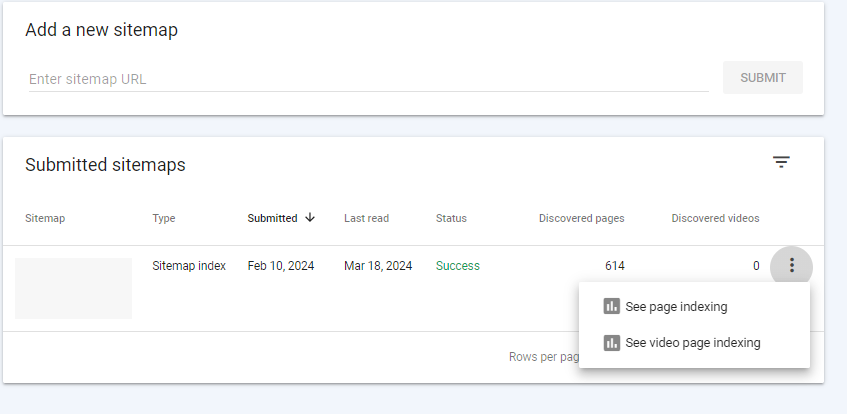
To see this comparison, click on the three vertical dots to the right of your sitemap and select “See page indexing.”
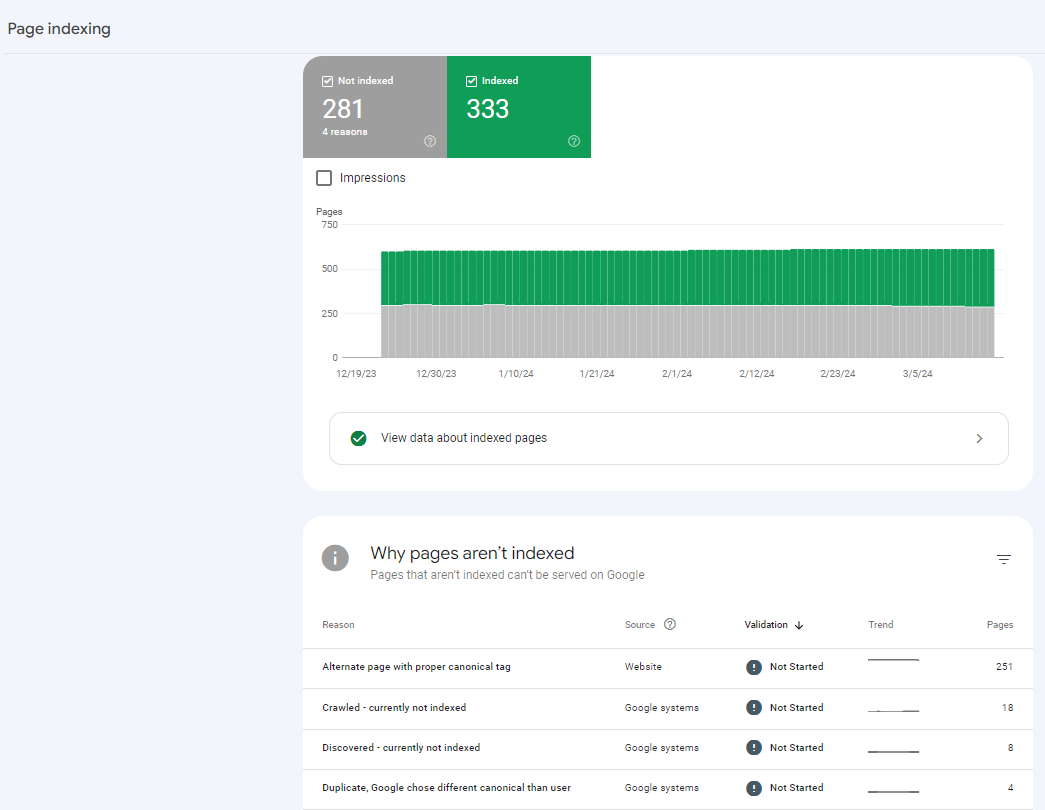
The resulting page will display the number of indexed pages (in green) and pages that are “Not Indexed” (in gray), as well as a list of reasons those pages are not indexed.
Setting Users, Owners, And Permissions
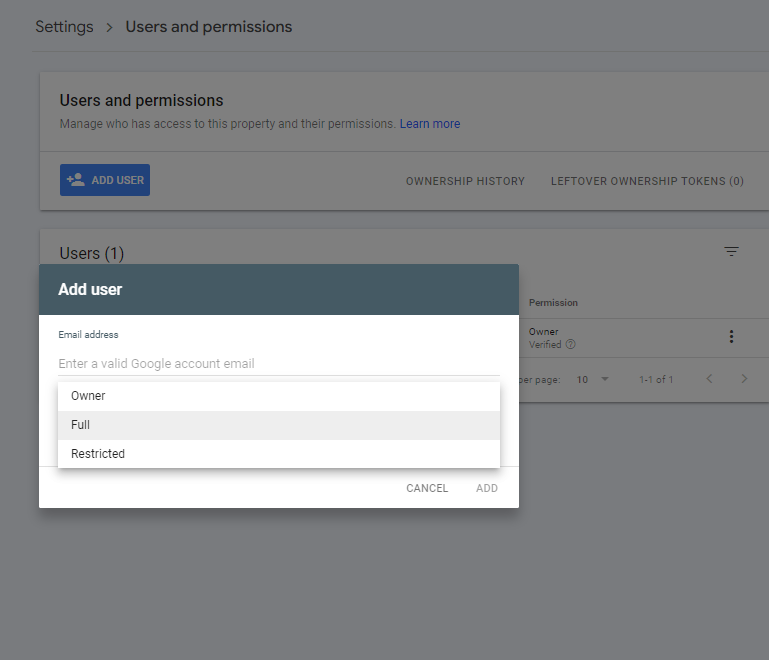
It is vital that you control who has access to the data and functionality within GSC. Some functions, such as the Removals tools, can be very dangerous in the wrong hands.
 Screenshot from author, March 2024
The permissions settings associated with user types limit who can access these parts of GSC.
- Owner – There are two types of owners: either the user has verified their ownership via one of the verification steps listed above or has had ownership delegated to them by an owner. This level of user has full control over the property up to complete removal from GSC.
- Full – This type of user has access to almost all the functions of the property Owner. However, if the Full user removes the property, it only removes the property from their list of sites, not from GSC entirely.
- Restricted – This user can only view the data within GSC. They are unable to make any changes to the account.
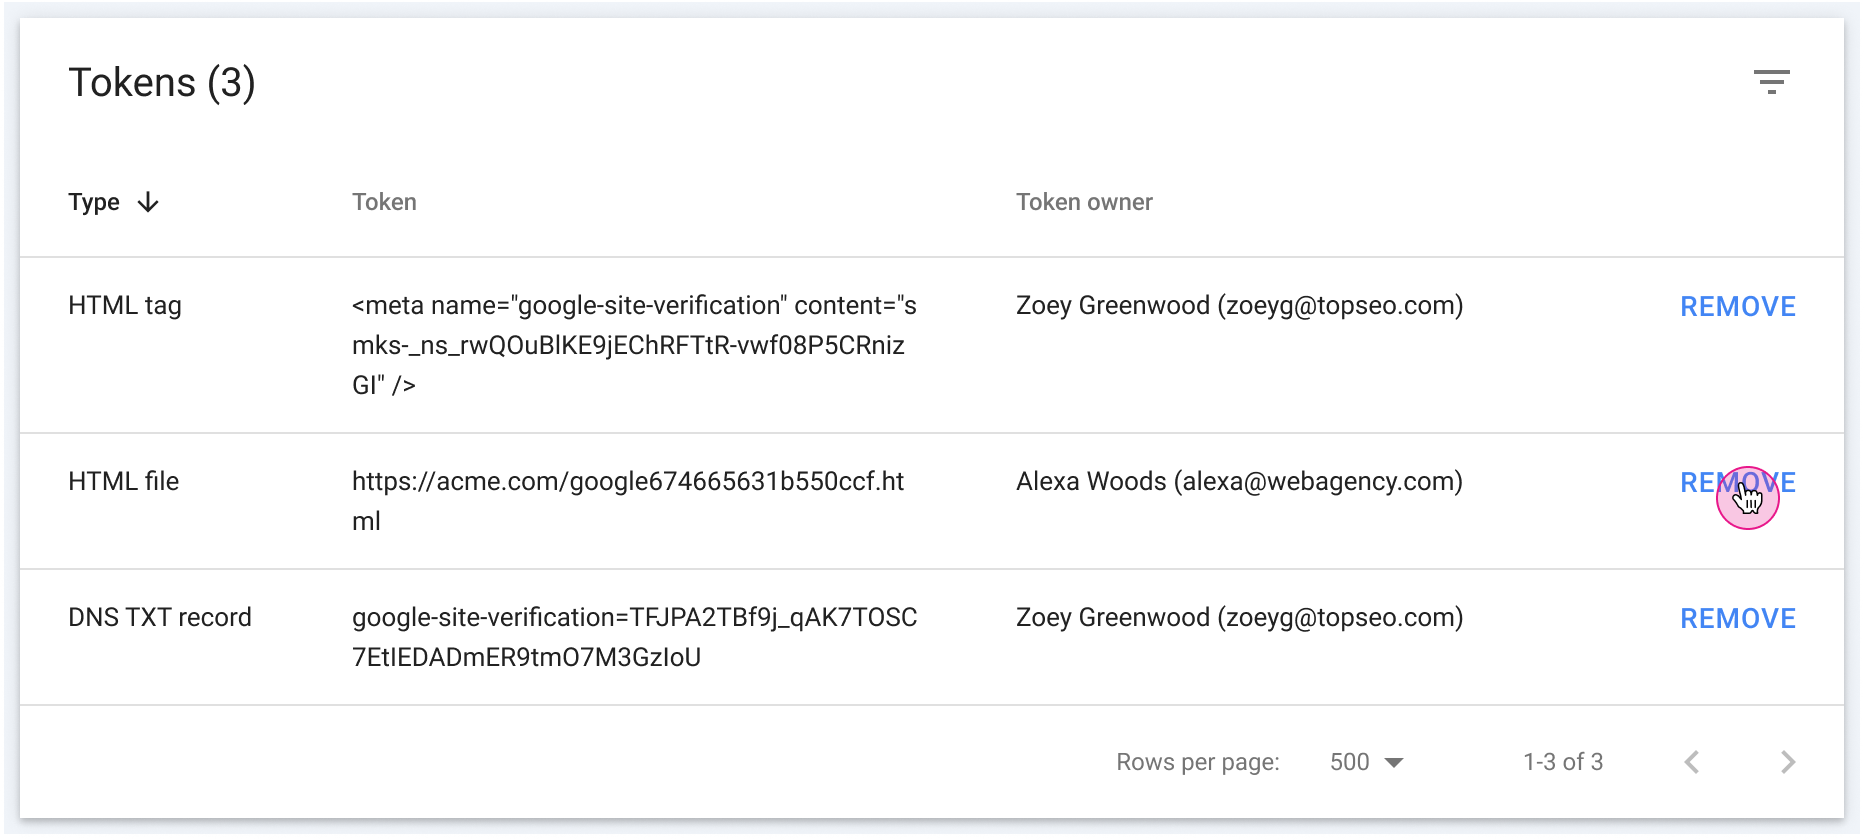
It is important to note that Google recently enhanced Search Console security by introducing a new feature for managing ownership tokens under Settings > Users and permissions > Unused ownership tokens
 Screenshot from developers.google.com
Tokens are simply those unique codes in HTML tags you set up in your head tag, HTML files you upload, or DNS TXT record values you set when verifying your website.
Now imagine a scenario where a website had multiple verified owners via HTML tag upload, and one of them left the company. If you remove that user from the search console, the issue is that the person can still regain access to the search console if you don’t remove their token from the unused ownership tokens page. This is an important feature, as website owners can now remove outdated verification tokens to prevent unauthorized access by former owners.
Dimensions And Metrics
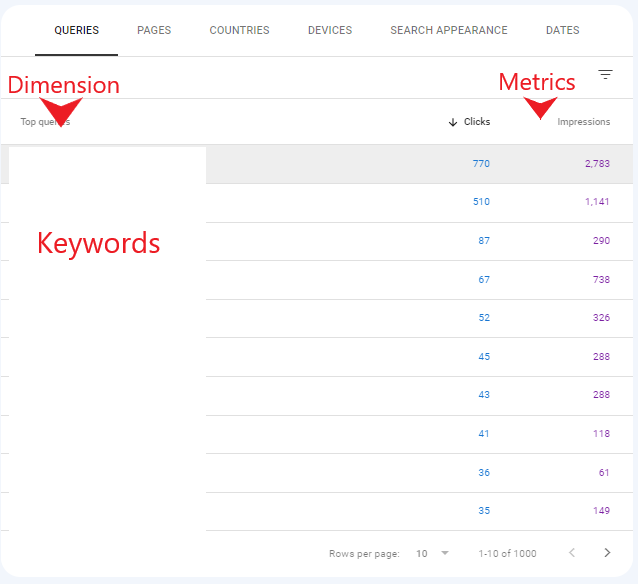
In Google Search Console, data is segmented into Dimensions and Metrics. You can use the data in these reports to measure your site’s performance, from page indexation to ranking and traffic.
In the Performance report, Dimensions group data into meaningful segments, such as Pages, Queries, Countries, and Devices. Metrics include data, such as Impressions and Clicks.
 Screenshot from author, March 2024
In the Pages report, a Dimension would include the reasons pages were not indexed, whereas Metrics would include the number of pages affected by that reason.
For Core Web Vitals, the Dimensions would be Poor, Needs Improvement, and Good. The Metrics would include the number of pages that fall into each category.
Troubleshooting With GSC
GSC is a valuable tool for SEO pros because it enables us to diagnose and evaluate pages from the perspective of Google. From crawlability to page experience, GSC offers a variety of tools for troubleshooting your site.
Crawling Issues
Long before a page can rank in the search engines, it needs to be crawled and then indexed. A page must be crawlable to be evaluated for search.
Whether you are experiencing crawl issues or not, it’s a good idea to regularly monitor the Crawl Stats report in GSC. This report tells you if it has encountered any issues with:
- Fetching your robots.txt files.
- Resolving your site’s DNS (Domain Name System).
- Connecting to your servers.
To use this report:
- Click on Settings in the left column of GSC.
- Click on Open Report next to Crawl Stats in the Crawling section of the Settings page.
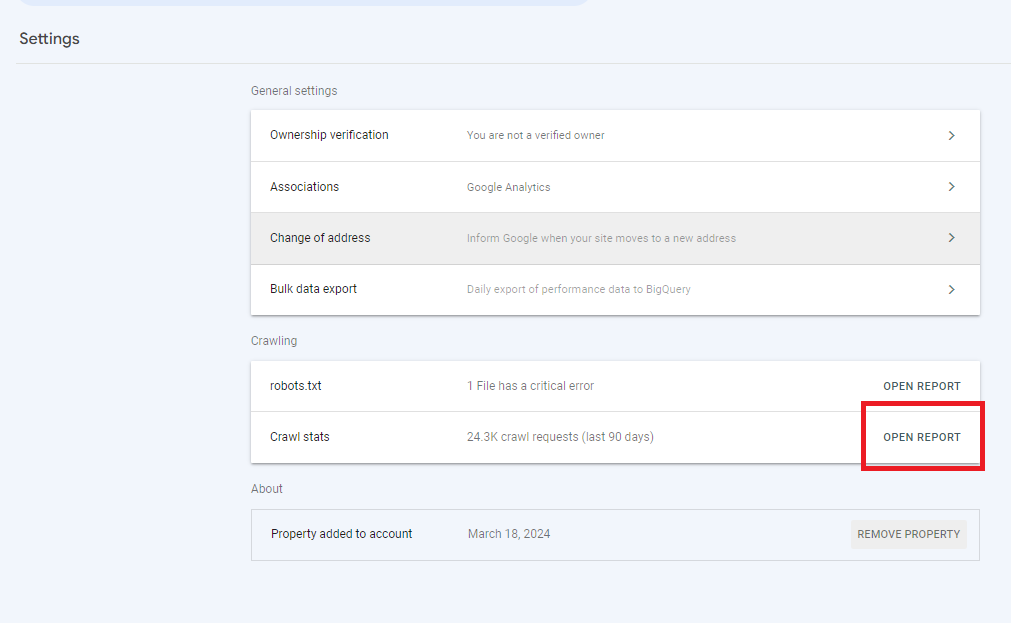 Screenshot from author, March 2024
 - Review the Hosts section of the page to see if any of your subdomains are experiencing problems,
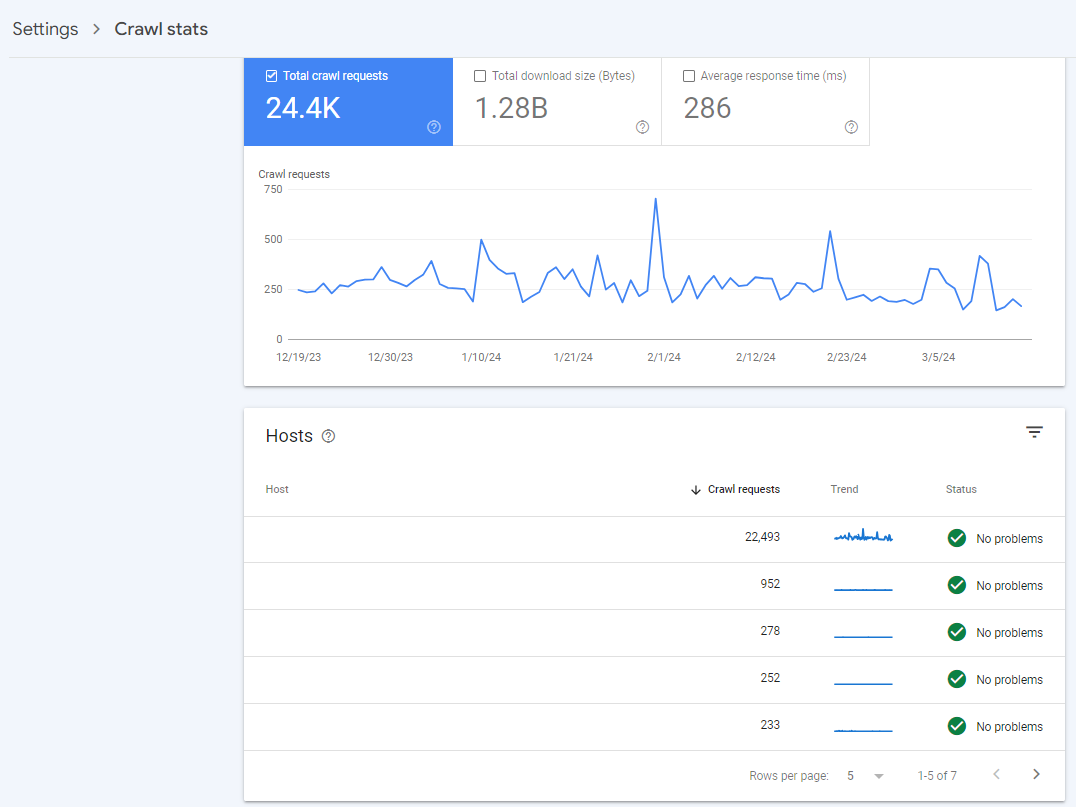 Screenshot from author, March 2024
 - If your host has experienced issues in the past, you will see a fail rate report.
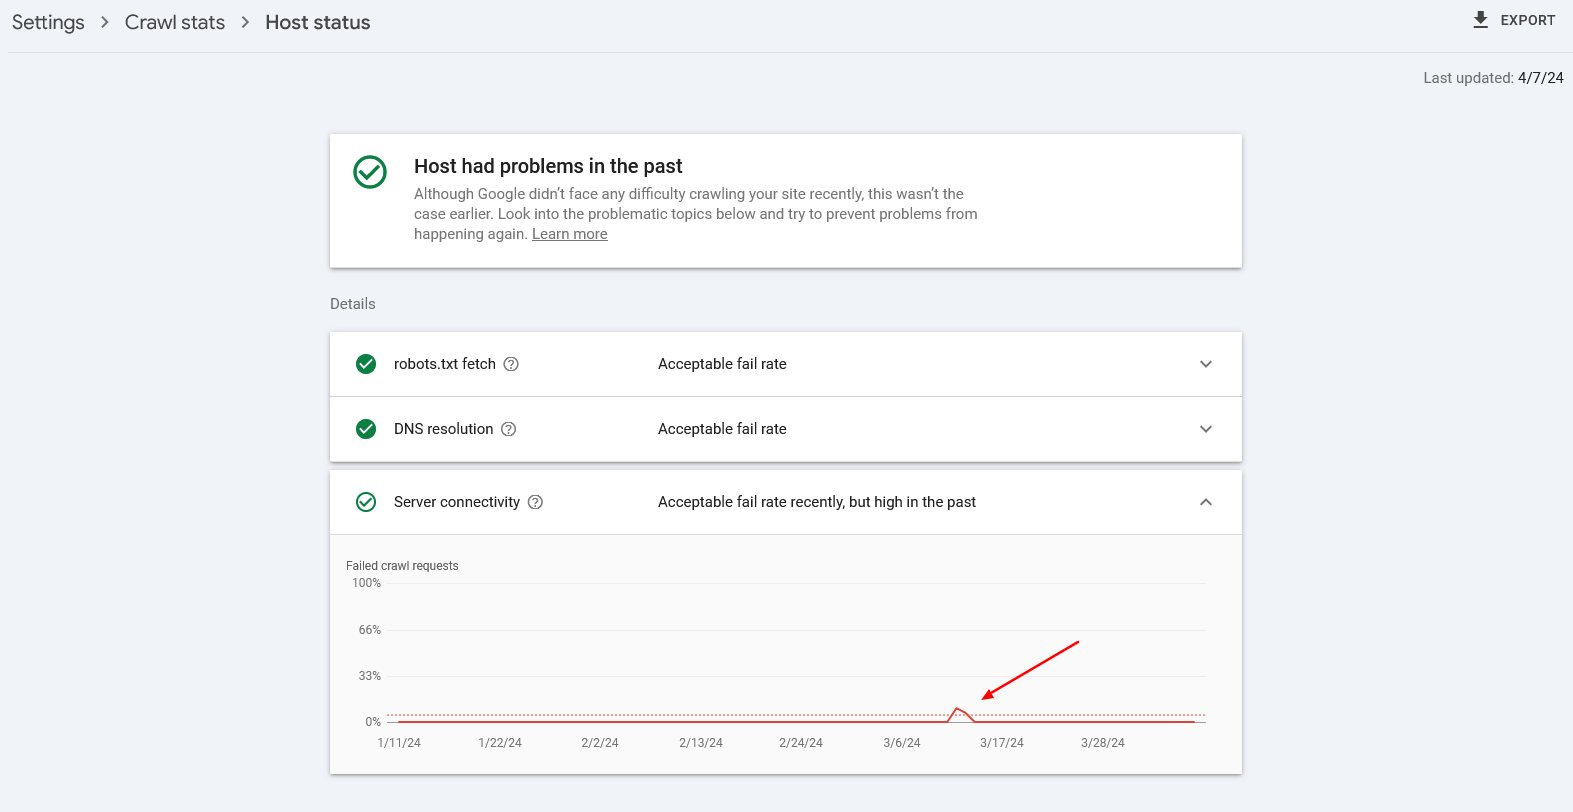 Host Status
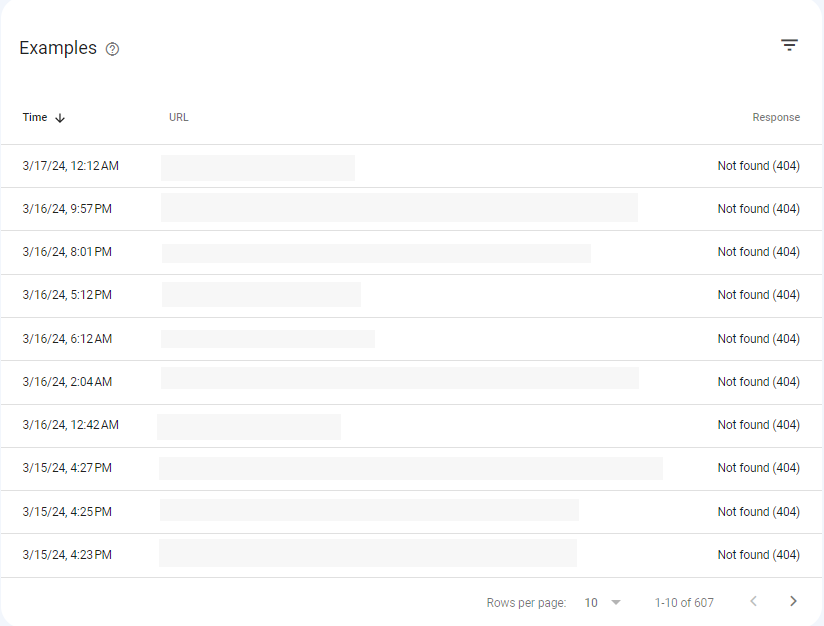
 - Review the By response section of the page to see what percentage of pages crawled result in suboptimal response codes.
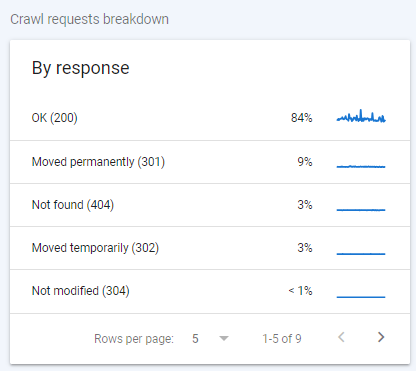 Screenshot from author, March 2024
 Screenshot from author, March 2024
If there are any pages with 404 response codes, click on Not found to review these pages.
Indexation Issues
If your pages are not indexed, they can’t rank for your most important terms. There are a couple of ways to see which pages on your site are not being indexed in GSC.
The first place you may feel compelled to view would be under the Pages report, located in the left column of GSC.
While you can access a lot of information about pages on your site that are both indexed and not indexed, this report can be a bit misleading.
The Not Indexed section of the report includes pages you may have intentionally not indexed, such as tag pages on your blog or pages you want to reserve for users who are logged in.
The best report for determining the true extent of indexation issues your site is having is in the Sitemaps report.
To get there:
- Click on “Sitemaps” in the left column of GSC.
- Click on the three vertical dots next to your site’s primary sitemap.
 Screenshot from author, March 2024
 - Select See page indexing.
The resulting report is like the Pages report, but it focuses on pages your site has outlined as important enough to include in the sitemaps you have submitted to Google.
 Screenshot from author, March 2024
From here, you can review the Reasons columns in the “Why pages aren’t indexed” table.
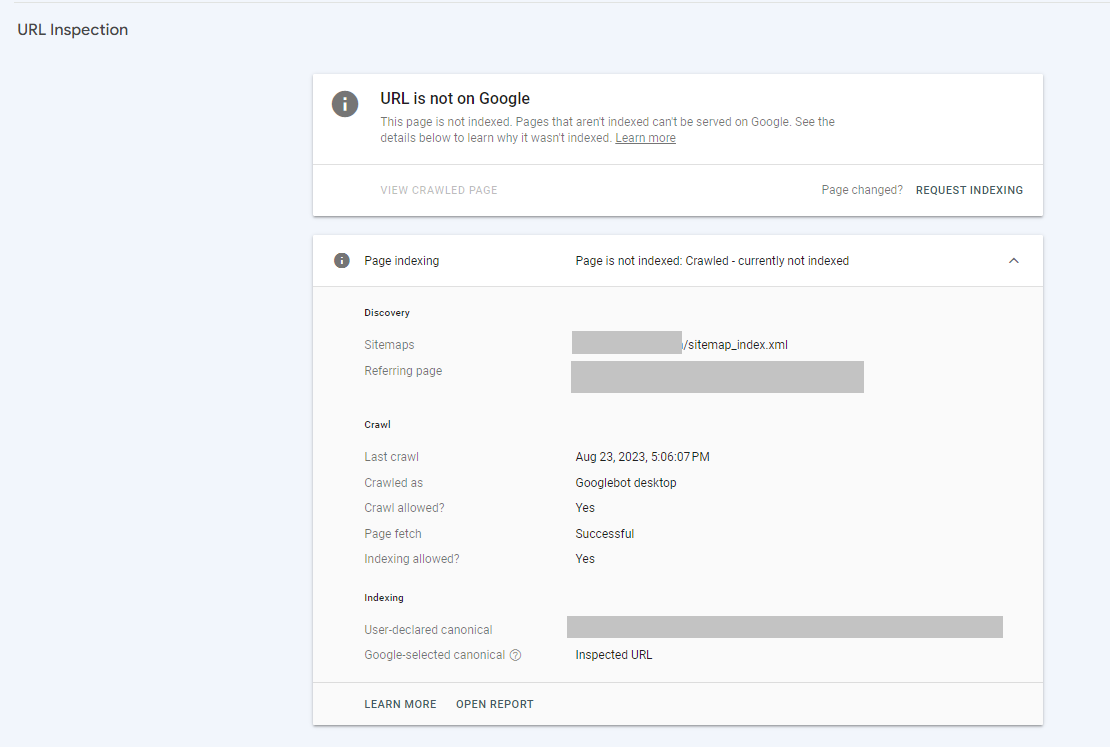
For example, you may have several pages that have been Crawled but are currently not indexed. To evaluate one of the pages, do the following:
- Click on the Crawled – currently not indexed line item to see the list of pages.
- Hover over one of the pages listed until three icons appear after the URL.
- Click on the Inspect URL icon.
 Screenshot from author, March 2024
 - From this page, you can Request Indexing manually.
- You can also click on the “TEST LIVE URL” button on the right side of the page.
- The resulting page will indicate whether or not your page is available to Google.
- To view the test results for the page, click on View Tested Page.
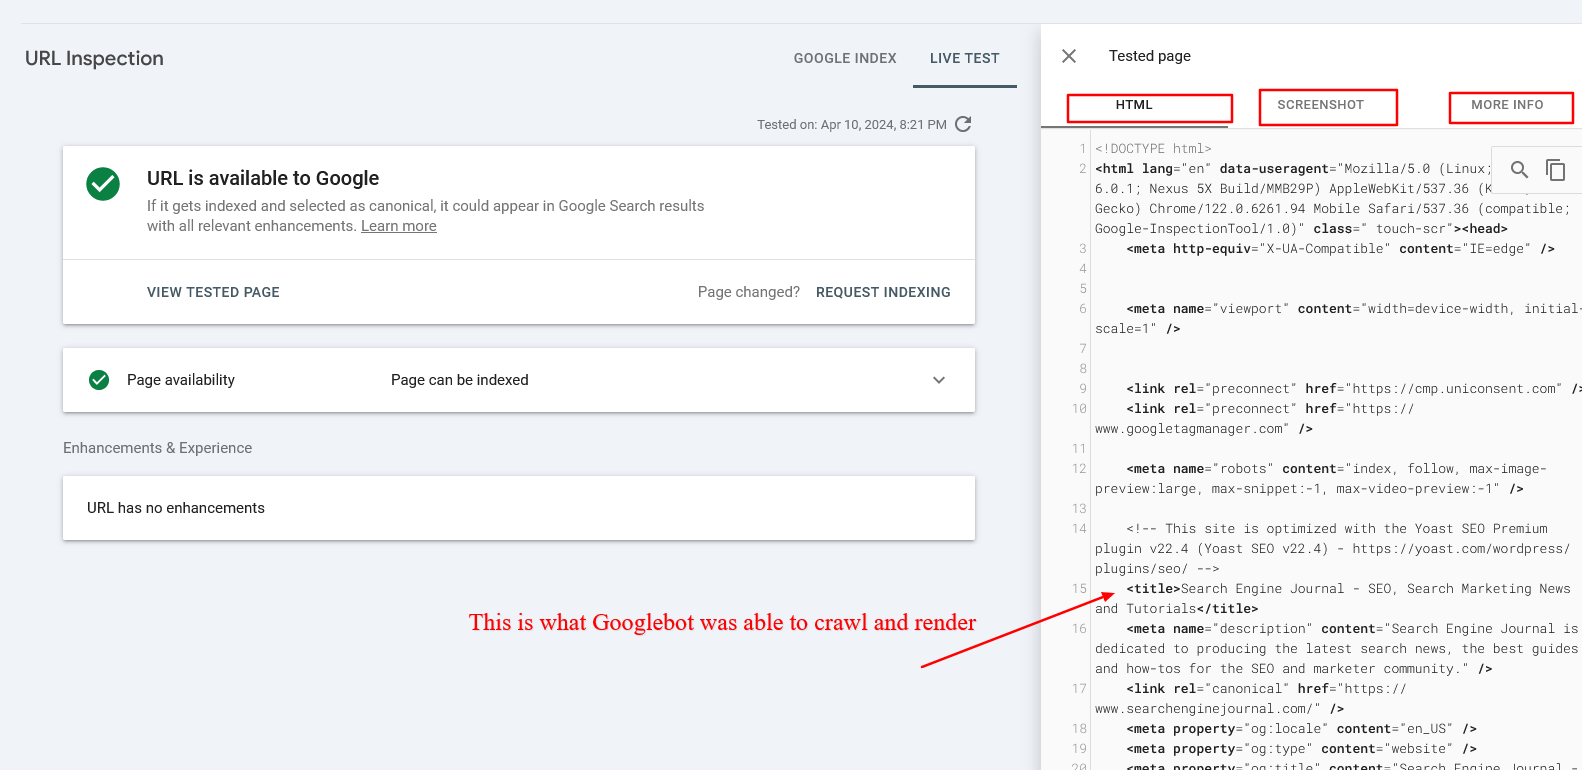
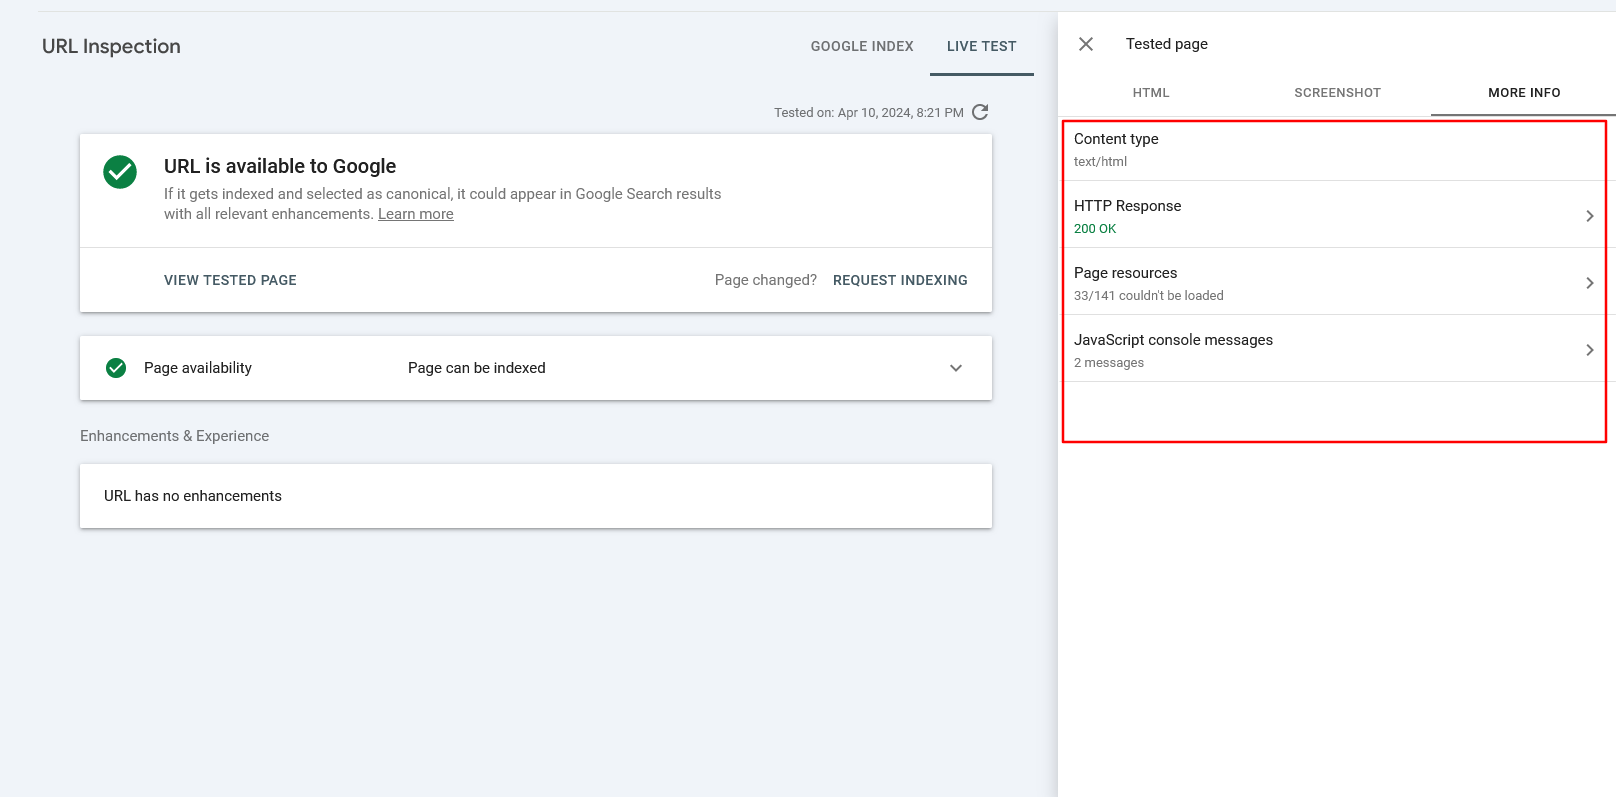
- The resulting pop-in window shows the HTML captured from the page, a smartphone rendering of the page, and “More Information” on the page, including any page resource issues or JavaScript console errors.
The HTML code displayed in the inspection tool reflects what Googlebot could crawl and render, which is especially crucial for JavaScript-based websites where the content does not initially exist within the static HTML but is loaded via JavaScript (via REST API or AJAX).
By examining the HTML, you can determine if Googlebot could properly see your content. If your content is missing, it means Google couldn’t crawl your webpage effectively, which could negatively impact your rankings.
By checking the “More Information” tab, you can identify if Googlebot could not load certain resources. For example, you may be blocking certain JavaScript files that are responsible for loading content via robots.txt.
If everything appears in order, click Request Indexing on the main URL inspection page. The field at the top of every page in GSC allows you to inspect any URL on your verified domain.
I would also recommend making sure Google doesn’t have issues when crawling robots.txt under Settings > robots.txt. If you have a robots.txt and Google isn’t able to fetch it ( for example, because of a firewall blocking access), then Google will temporarily stop crawling your website for 12 hours. If the issue is not fixed, it will behave as if there is no robots.txt file.
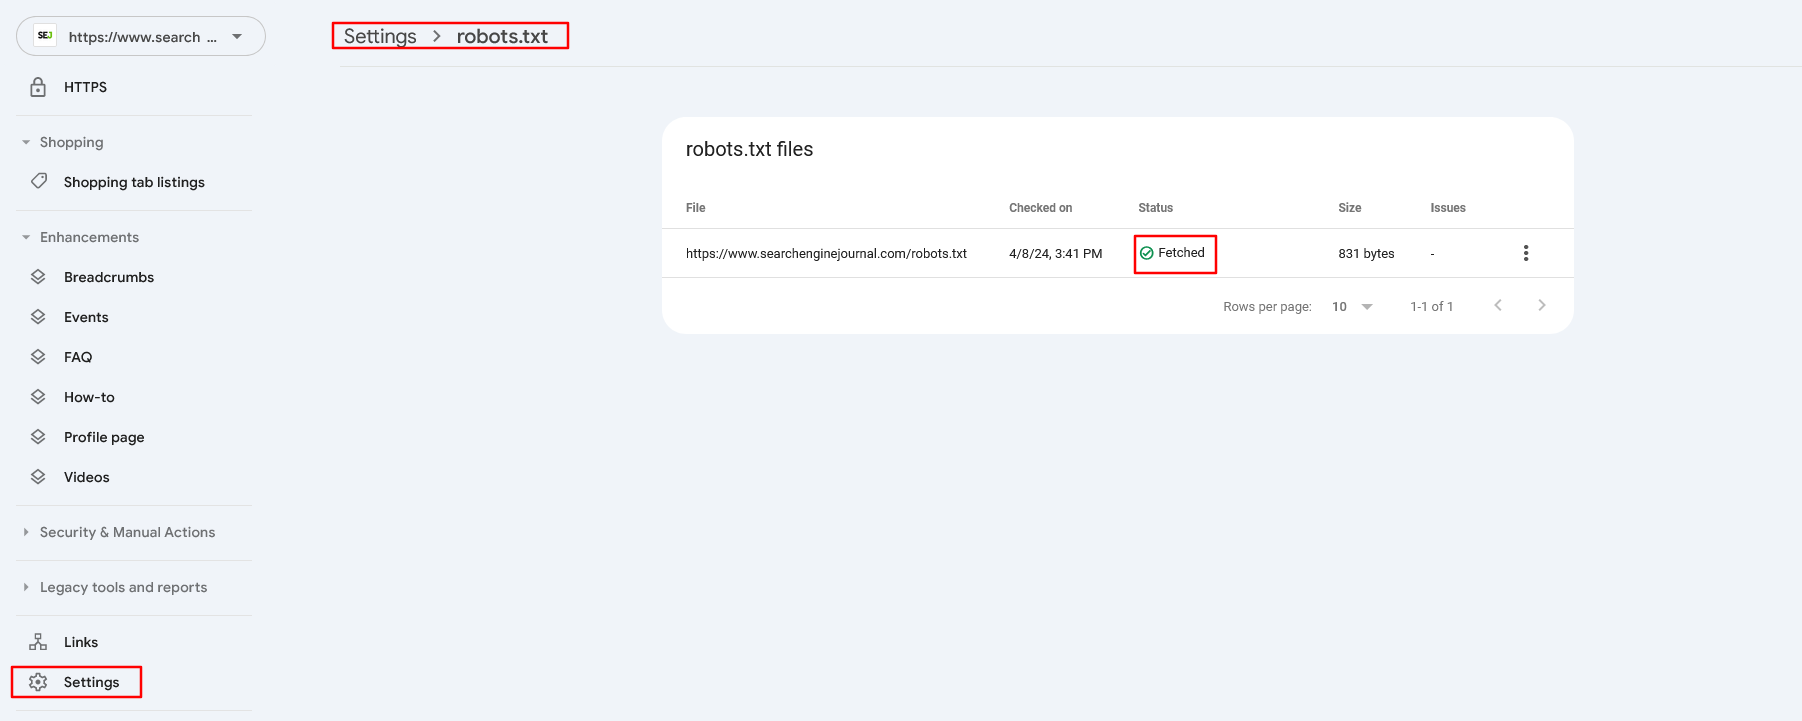 Robots.txt Setting in Search Console
Performance Issues
If you’re having difficulty getting pages into Google index or ranking in the search engines, it may be worth it to review the Core Web Vitals (CWV) across your site.
These are a measure of how your site performs for actual users, pulling in data from the Chrome User Experience Report (CrUX for short).
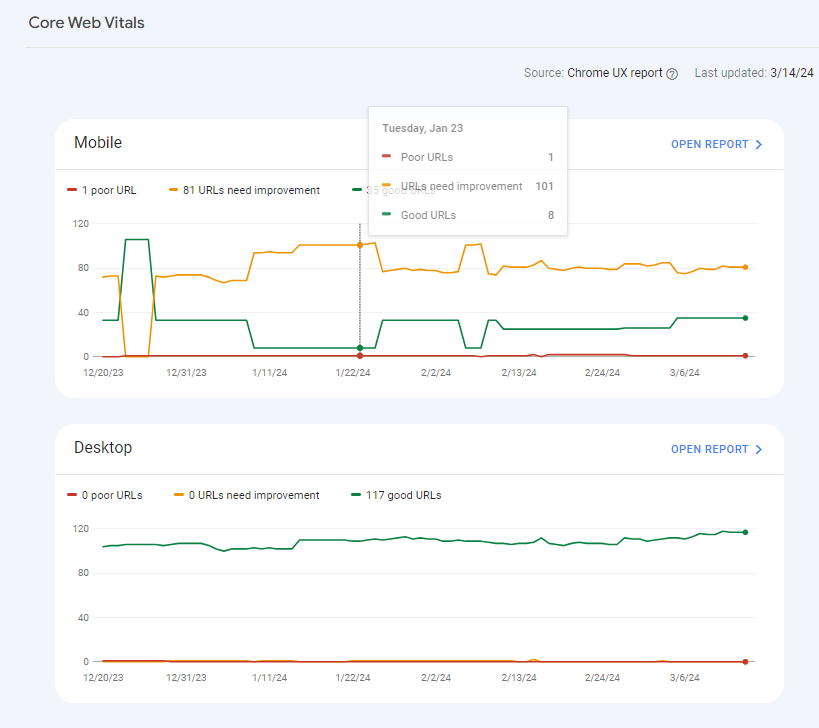
CWV measures three major usability metrics: Cumulative Layout Shift (CLS), Interaction to Next Paint (INP), and Largest Contentful Paint (LCP).
- Cumulative Layout Shift (CLS) measures how much the layout of your page shifts as elements load on the page. If images jumble and shift text on your page as they load, this can result in a poor user experience.
- Interaction to Next Paint (INP), which replaced the First Input Delay (FID), measures how long your page takes to respond once a user scrolls, clicks, or takes any action on your page that loads additional content.
- Largest Contentful Paint (LCP) is a measure of how long the greatest portion of content on your page takes to fully render for the user.
GSC provides a score for both mobile and desktop, and pages are lumped into Good, Needs Improvement, or Poor based on CWV scores.
To see the issues your pages may have:
- Click on Core Web Vitals in the left column of GSC.
- Click on Open Report in either the Mobile or the Desktop graph.
- Click on one of the line items in the Why URLs aren’t considered good table.
- Click on an Example URL.
- Click on the three vertical dots next to one of the Example URLs in the pop-in window.
- Click on Developer Resources – PageSpeed Insights.
- The resulting page will allow you to see Diagnostics of issues that could be affecting your CWV.
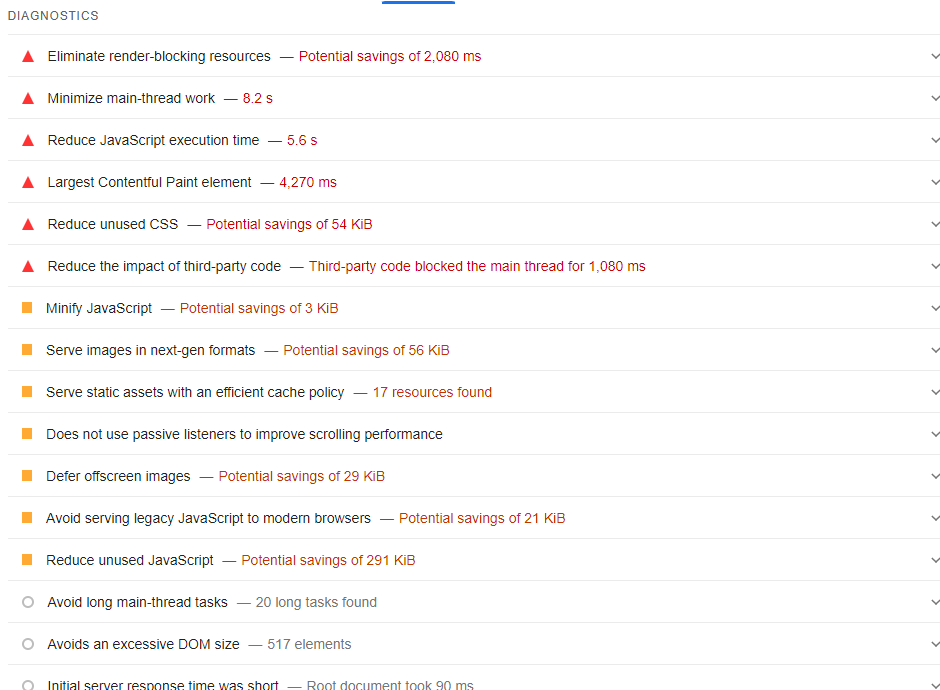 Screenshot from author, March 2024
Use these diagnostics to inform your developers, designers, and engineers, who can help you resolve those issues.
Tip: Make sure your website is using HTTPS since it improves your website security and is also a ranking factor. This is quite easy to implement because nowadays, almost all hosting providers provide free SSL certificates that can be installed with just one click.
Security And Manual Actions
If you are experiencing issues with indexation and ranking, it’s also possible that Google has encountered a security issue or has taken manual action against your site.
GSC provides reports on both Security and Manual Actions in the left column of the page.
If you have an issue with either, your indexation and ranking issues will not go away until you resolve them.
5 Ways You Can Use GSC For SEO
There are five ways you can use GSC for SEO in your daily activities.
1. Measuring Site Performance
The top part of the Search Console Performance Report provides multiple insights on how a site performs in search, including in search features like featured snippets.
Four search types can be explored in the Performance Report:
By default, the Search Console shows the Web search type.
Change which search type is displayed by clicking the Search Type button:
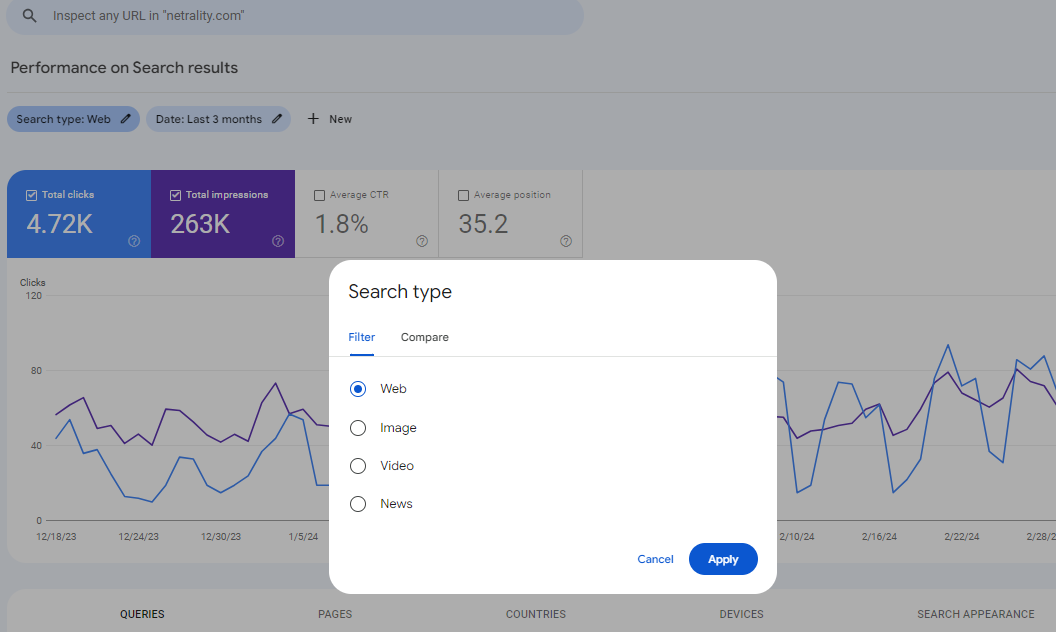
A useful feature is the ability to compare the performance of two search types within the graph.
Four metrics are prominently displayed at the top of the Performance Report:
- Total Clicks.
- Total Impressions.
- Average CTR (click-through rate).
- Average position.
By default, the Total Clicks and Total Impressions metrics are selected.
By clicking within the tabs dedicated to each metric, you can choose to see those metrics displayed on the bar chart.
Impressions
Impressions are the number of times a website appears in the search results. If a user doesn’t have to click a link to see the URL, it counts as an impression.
Additionally, if a URL is ranked at the bottom of the page and the user doesn’t scroll to that section of the search results, it still counts as an impression.
High impressions are great because it means that Google is showing the site in the search results.
The impressions metric is made meaningful by the Clicks and the Average Position metrics.
Clicks
The clicks metric shows how often users clicked from the search results to the website. A high number of clicks and a high number of impressions is good.
A low number of clicks and a high number of impressions is less good but not bad. It means that the site may need improvements to gain more traffic.
The clicks metric is more meaningful when considered with the Average CTR and Average Position metrics.
Average CTR
The Average CTR is a percentage representing how often users click from the search results to the website.
A low CTR means that something needs improvement in order to increase visits from the search results, whether it’s changing the page title or updating the meta description.
A higher CTR means the site is performing well with users.
This metric gains more meaning when considered together with the Average Position metric.
Average Position
Average Position shows the average position in search results the website tends to appear in.
An average in positions of 1 to 10 is great.
An average position in the twenties (20 – 29) means that the result appears after the user scrolls through the search results, revealing more results. While this isn’t bad, it isn’t optimal. It can mean that the site needs additional work to boost it into the top 10.
Average positions lower than 30 could (generally) mean that the pages in question may benefit from significant improvements.
It could also indicate that the site ranks for a large number of keyword phrases that rank low and a few very good keywords that rank exceptionally high.
All four metrics (Impressions, Clicks, Average CTR, and Average Position), when viewed together, present a meaningful overview of how the website is performing.
The big takeaway about the Performance Report is that it is a starting point for quickly understanding website performance in search.
It’s like a mirror reflecting how well or poorly the site is performing.
2. Finding “Striking Distance” Keywords
The Search results report in the Performance section of GSC allows you to see the Queries and their average Position.
While most queries for which many companies rank in the top three in GSC are branded terms, the queries that fall in the five to 15 rank are considered “striking distance” terms.
You can prioritize these terms based on impressions and refresh your content to include those queries in the language of those pages.
To find these terms:
- Click on Performance in the left column of GSC.
- Click on Search results.
- Total clicks and Total impressions will be enabled by default, so click on Average position to enable that metric as well
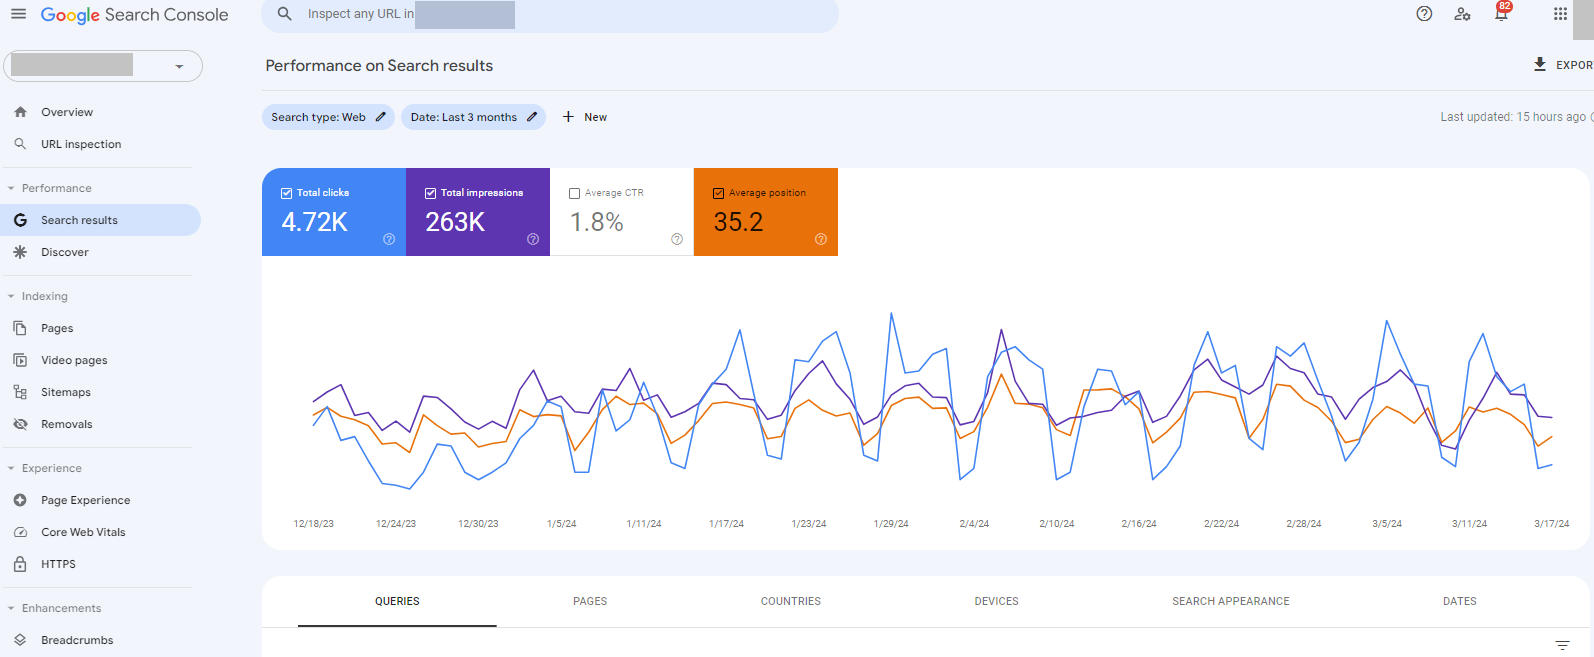
- In the Queries table below, sort the columns by Position and click forward until you get to position 5 through 15.
- Capture the queries that have higher impressions and use these to edify your content strategy.
3. Request Faster Indexation Of New Pages
For many sites, Googlebot is very efficient and discovers new pages quickly. However, if you have a priority page that you need indexed in a hurry, you can use the URL Inspection tool to test the live URL and then request indexing.
To request indexing:
- Click on URL inspection in the left column of GSC.
- Paste the URL of the page you want indexed into the top search box.
 Screenshot from author, March 2024
 Screenshot from author, March 2024
- Hit <Enter>.
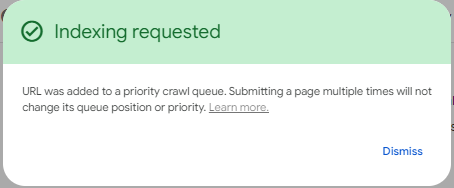
- On the subsequent URL Inspection page, click Request indexing.
 Screenshot from author, March 2024
This process will add your URL to Googlebot’s priority queue for crawling and indexing; however, this process does not guarantee that Google will index the page.
If your page is not indexed after this, further investigation will be necessary.
Note: Each verified property in GSC is limited to 50 indexing requests daily.
4. Bulk Data Export
GSC historical data are limited to a maximum of 16 months. Fortunately, you can overcome this issue by exporting GSC data into BigQuery, where it can be stored indefinitely. This allows you to access as much historical data as you desire. Since this action is not retroactive, you should start as soon as possible.
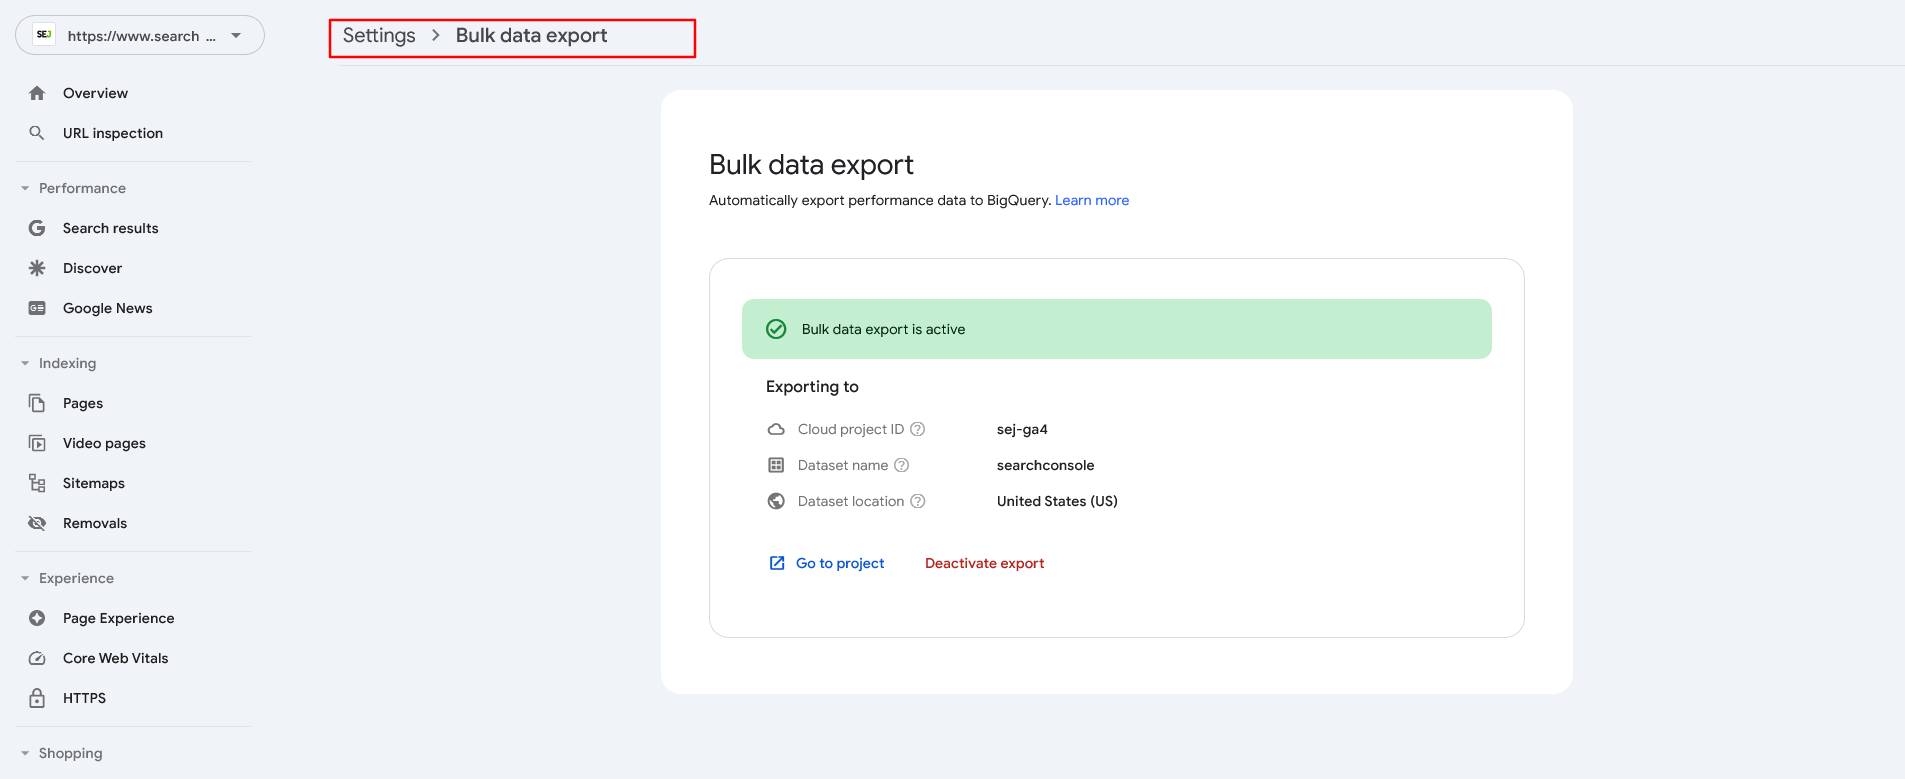 Import GSC data into BigQuery
Read more: Google Search Console Data & BigQuery For Enhanced Analytics
5. Bonus: Integration With Other SEO Tools
While you can do many things within GSC, some real magic happens when you integrate the data within GSC into the many SEO tools and platforms available on the market.
Integrating GSC into these tools gives you a sharper view of your site’s performance and potential.
From desktop crawlers, like Screaming Frog and Sitebulb, to enterprise server-driven crawlers, like Lumar and Botify, integrating your GSC information can result in a more thorough audit of your pages, including crawlability, accessibility, and page experience factors.
Integrating GSC into large SEO tools, like Semrush and Ahrefs, can provide more thorough ranking information, content ideation, and link data.
Additionally, the convenience of having all your data in a single view cannot be overstated. We all have limited time, so these options can greatly streamline your workload.
GSC Is An Essential Tool For Site Optimization
Google Search Console has evolved over its nearly two-decade lifespan. Since its release as Google Webmaster Tools, it has provided valuable insights for SEO pros and site owners.
If you haven’t integrated it into your daily activities, you will quickly find how essential it is to make good decisions for your site optimizations going forward.
More resources:
Featured Image: BestForBest/Shutterstock

